Graphical configuration: Network Manager
If you use Network Manager (as on most personal Linux desktops running Ubuntu or similar), you may be able to configure the VPN using the network settings interface. This is the recommended way to connect if you are already using Network Manager (though on some older operating systems, Network Manager might not support our VPN).
- Obtain your VPN password from vpnpassword.cl.cam.ac.uk
- Install strongSwan, including "charon" (the IKEv2 component) and all its plugins, and the Network Manager strongSwan module. On Ubuntu, use the command:
sudo apt install network-manager-strongswan strongswan-charon libcharon-extra-plugins libcharon-extauth-plugins - In Settings → Network, under the VPN heading, click + (Add); choose "IPsec/IKEv2 (strongswan)" as the VPN type:
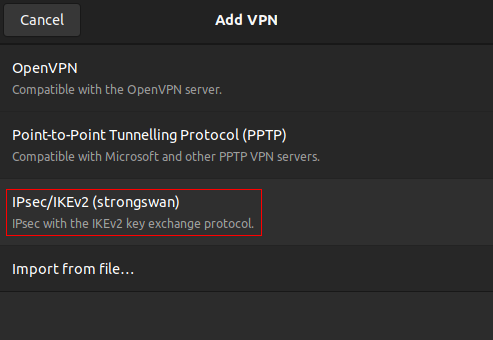
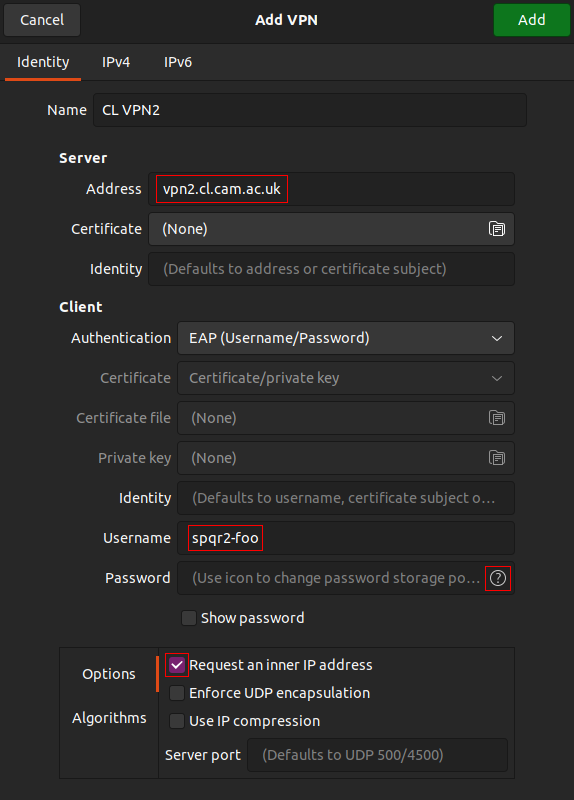
(If you do not see this option, check that you installed all the packages listed above. If you did, try restarting your computer, or Network Manager.) - Fill in the following settings, leaving everything else blank:
Server address: vpn2.cl.cam.ac.uk
Username: the one you obtained from vpnpassword.cl.cam.ac.uk
Password: click the ? icon to select how the password will be stored, then use the one you obtained from vpnpassword.cl.cam.ac.uk
Tick Request an inner IP address
Manual configuration: ipsec.conf
- Install strongSwan, including "charon" (the IKEv2 component) and all its plugins. On Ubuntu 22.04, use: sudo apt install strongswan-charon libcharon-extauth-plugins libcharon-extra-plugins
- Add a connection to /etc/ipsec.conf such as:
conn CL
    keyexchange=ikev2
    reauth=no
    left=%any
    leftid="YOUR_USERNAME"
    leftauth=eap
    leftsourceip=%config4,%config6
    leftfirewall=yes
    right="vpn2.cl.cam.ac.uk"
    rightid=%any
    rightsendcert=never
    rightsubnet=128.232.0.0/16,129.169.0.0/16,131.111.0.0/16,192.18.195.0/24,193.60.80.0/20,193.63.252.0/23,172.16.0.0/13,172.24.0.0/14,172.28.0.0/15,172.30.0.0/16,10.128.0.0/9,10.64.0.0/10,2001:630:210::/44,2a05:b400::/32
    auto=add

ca usertrust
    cacert=/etc/ssl/certs/USERTrust_RSA_Certification_Authority.pem
    auto=add
(Your username is your CRSid followed by the device ID you used in vpnpassword, e.g. "spqr2-laptop". Substitute that in place of YOUR_USERNAME above and below. You may need to adjust the path to the USERTrust certificate if your system installs it in a different location.)
- Obtain your VPN password from vpnpassword.cl.cam.ac.uk
- Add the password to /etc/ipsec.secrets by adding a line with the following syntax:
YOUR_USERNAME : EAP "YOUR_PASSWORD"
- Restart strongSwan. for example: sudo service strongswan restart or sudo service strongswan-swanctl restart or sudo service strongswan-starter restart
- If you are using Network Manager for anything else on your system, see below
- When needed, connect to the VPN using: sudo ipsec up CL
- And disconnect using: sudo ipsec down CL
Manual configuration: swanctl
Some distributions' strongSwan packages do not support ipsec.conf or the "ipsec" command; in that case you can use the newer swanctl configuration method.
- Add a file called (for example) /etc/swanctl/conf.d/cl.conf containing:
connections {
    CL {
        version=2
        remote_addrs=vpn2.cl.cam.ac.uk
        vips=0.0.0.0,::
        send_certreq=0
        local-1 {
            auth=eap-mschapv2
            eap_id=YOUR_USERNAME
        }
        children {
            CL {
                remote_ts=128.232.0.0/16,129.169.0.0/16,131.111.0.0/16,192.18.195.0/24,193.60.80.0/20,193.63.252.0/23,172.16.0.0/13,172.24.0.0/14,172.28.0.0/15,172.30.0.0/16,10.128.0.0/9,10.64.0.0/10,2001:630:210::/44,2a05:b400::/32
            }
        }
    }
}
authorities {
    usertrust {
        file=/etc/ssl/certs/USERTrust_RSA_Certification_Authority.pem
    }
}
(Your username is your CRSid, e.g. "spqr2". Substitute that in place of YOUR_USERNAME above and below. You may need to adjust the path to the USERTrust certificate if your system installs it in a different location.)
- Obtain your VPN password from vpnpassword.cl.cam.ac.uk
- Add the password to /etc/ipsec.secrets by adding a line with the following syntax:
YOUR_USERNAME : EAP "YOUR_PASSWORD"
- Restart strongSwan: sudo service strongswan restart
- If you are using Network Manager for anything else on your system, see below
- When needed, connect to the VPN using: sudo swanctl --initiate --child CL
- And disconnect using: sudo swanctl --terminate --ike CL
Network Manager DNS workarounds
If you are manually connecting to the VPN using StrongSWAN (swanctl or ipsec up), and you are also using Network Manager for something else (for example to connect to wifi), you may encounter DNS problems if StrongSWAN and Network Manager disagree on how to configure your DNS.
For example on Red Hat systems, StrongSWAN uses systemd-resolved to configure DNS; you may need to configure Network Manager to do the same.
You can do so by adding:
[main]
dns = systemd-resolved
to /etc/NetworkManager/NetworkManager.conf.